


Installing an industrial air oil separator filter correctly is one of the most critical maintenance tasks you can perform on a rotary screw compressor. When this component is properly seated and secured, it ensures that compressed air leaving the system contains minimal oil carryover, protecting downstream equipment, reducing oil consumption, and maintaining system efficiency. A poorly installed industrial air oil separator filter, on the other hand, can lead to oil-contaminated air, elevated operating temperatures, increased pressure drop, and even premature compressor failure. Understanding the correct installation procedure from start to finish is therefore essential for any maintenance engineer or facility manager responsible for compressed air systems.
This guide walks you through the complete process of installing an industrial air oil separator filter, from pre-installation checks to final system verification. Whether you are replacing a worn-out element during scheduled maintenance or addressing an urgent contamination issue, following these steps ensures a safe, effective, and long-lasting installation. The industrial air oil separator filter is not a component that forgives shortcuts — precision and preparation are the keys to getting this job right every time.
Understanding the Role of the Industrial Air Oil Separator Filter
What the Filter Does Inside a Compressor System
Before diving into installation steps, it is important to understand exactly what the industrial air oil separator filter is designed to do. In a rotary screw compressor, oil is injected directly into the compression chamber to cool the air, lubricate the rotors, and seal internal clearances. After compression, the air and oil mixture enters a separation tank where gravity and centrifugal action remove the bulk of the oil. However, fine oil aerosols still remain suspended in the compressed air, and this is where the industrial air oil separator filter takes over.
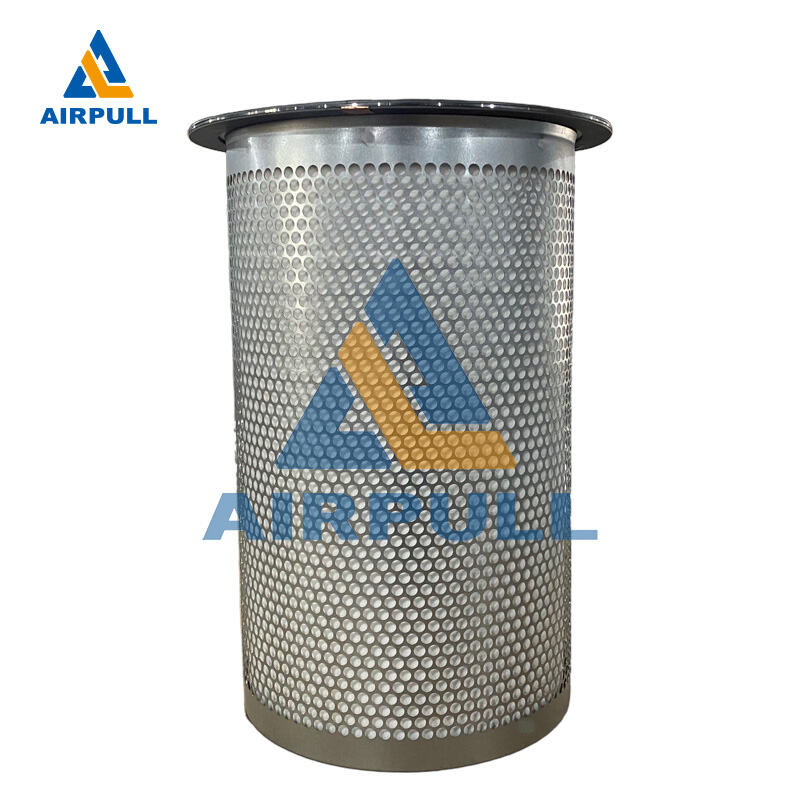
The filter element uses multiple layers of borosilicate glass fiber media to coalesce microscopic oil droplets into larger drops that drain back into the oil sump. A properly functioning industrial air oil separator filter will reduce oil carryover to levels typically below 3 ppm, which is critical for protecting air tools, process equipment, and pneumatic controls downstream. When the element becomes saturated or clogged, pressure differential increases, the compressor works harder, and oil carryover rises significantly — all signs that a replacement and correct reinstallation are overdue.
Recognizing the Right Time to Replace and Reinstall
Most manufacturers recommend replacing the industrial air oil separator filter every 2,000 to 4,000 operating hours, but actual service life varies based on operating environment, inlet air quality, and oil type. If your compressor is operating in a dusty or humid environment, the element may need replacement more frequently. Key indicators that your industrial air oil separator filter needs immediate replacement include a differential pressure reading consistently above 0.8 bar (12 psi), visible oil in the compressed air lines, or a noticeable drop in system flow capacity.
Scheduling filter replacement as part of a proactive maintenance program rather than waiting for failure signs is always the better approach. Every time the element is replaced, the installation procedure must be performed carefully to avoid introducing new problems. Even a new industrial air oil separator filter installed incorrectly can perform worse than the old worn element, so the installation process itself deserves as much attention as the choice of replacement part.
Tools and Safety Preparations Before Installation
Gathering the Necessary Tools and Replacement Parts
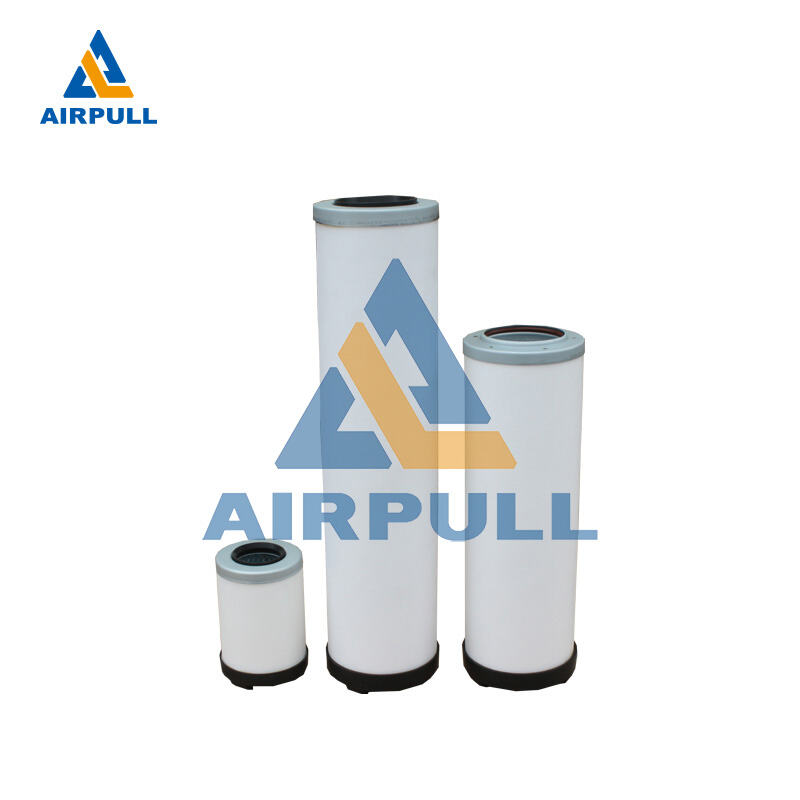
Proper installation of the industrial air oil separator filter begins well before any wrenches are picked up. Start by gathering all tools you will need: a set of adjustable and open-end wrenches, a torque wrench calibrated to the compressor manufacturer's specifications, clean lint-free rags, a drain pan for residual oil, a new O-ring kit compatible with your separator housing, and the correct replacement industrial air oil separator filter element for your specific compressor model. Using the wrong element size or media type is one of the most common installation errors and can result in immediate system performance issues.
Confirm the part number of your replacement industrial air oil separator filter against the compressor's service manual or the label on the existing housing. Some compressor platforms use multiple compatible elements with different efficiency ratings, so verifying the correct specification before installation prevents costly rework. Keep the new element in its packaging until the moment of installation to avoid contaminating the media with dust, moisture, or handling oils.
Establishing a Safe Working Environment
Safety is non-negotiable when working on a compressed air system. Before beginning any work, shut down the compressor completely and isolate it from its power source using a lockout/tagout procedure. Allow the system to cool for at least 30 minutes if the compressor has been recently running, as oil temperatures inside can exceed 90°C and cause serious burns. Slowly vent all system pressure through the manual blowdown valve before opening any housing or connection on the separator tank — attempting to open the separator housing under pressure is extremely dangerous.
Position a drain pan beneath the separator housing to catch residual oil when the housing cover is removed. Have absorbent rags ready to manage spills. Ensure your work area is well lit and free of obstructions. These preparation steps might seem basic, but they prevent the majority of injuries and damage events associated with industrial air oil separator filter replacement jobs performed in field conditions.
Step-by-Step Installation of the Industrial Air Oil Separator Filter
Removing the Old Filter Element
With the system safely depressurized, cooled, and isolated, begin by removing the separator tank cover or access panel. On most rotary screw compressors, this involves unbolting a flanged lid or unscrewing a large threaded cap depending on the tank design. Once the cover is off, carefully lift out the old industrial air oil separator filter element. Note its orientation — specifically which end faces up and whether it has a specific inlet or outlet side — as you will replicate this orientation with the new element.
Inspect the inside of the separator tank carefully. Look for signs of excessive oil sludge, metal particles, or debris that may indicate a broader lubrication issue requiring attention before the new industrial air oil separator filter is installed. Wipe down all internal surfaces with clean lint-free rags. Do not use solvent-based cleaners inside the tank unless specifically approved by the compressor manufacturer, as residues can damage the new filter media.
Preparing the Housing and Installing the New Element
Before installing the new industrial air oil separator filter, replace all sealing O-rings and gaskets on the housing. Old O-rings may appear visually acceptable but can develop micro-cracks that cause air bypasses, allowing unfiltered air to pass around the element. Lightly lubricate the new O-rings with clean compressor oil — not grease — and seat them carefully in their grooves without twisting or stretching. A properly seated O-ring is the difference between a leak-free housing and a system that hemorrhages compressed air at the separator joint.
Lower the new industrial air oil separator filter element into the housing, ensuring it is correctly oriented and seated firmly in the bottom cradle or retaining ring. Some elements have a scavenge tube port at the bottom that must align precisely with the oil return line in the tank floor. This oil return line allows small oil quantities collected at the base of the element to drain back into the sump — if this line is blocked or misaligned, oil will accumulate at the element base, increasing pressure drop and reducing element life significantly. Confirm alignment visually before proceeding.
Reassembling the Housing and Reconnecting Lines
Once the new industrial air oil separator filter is correctly positioned, replace the separator tank cover and hand-tighten all fasteners evenly in a cross-pattern sequence. Then, using your torque wrench, tighten to the manufacturer's specified torque value — this is typically listed in the service manual and varies by compressor model and housing size. Over-tightening can crack the housing or deform O-ring seals, while under-tightening will allow air and oil leaks under operating pressure.
Reconnect the oil scavenge line, the compressed air outlet line, and any pressure differential sensing lines that were disconnected during element removal. Inspect all connection fittings for wear and replace any that show signs of thread damage or corrosion. Ensure that all connections are fully tightened and that no rags or tools have been left inside the separator tank before closing it permanently. A final visual sweep of the work area to confirm nothing is missing is always worthwhile.
Post-Installation Checks and System Verification
Initial Startup and Leak Detection
With the installation complete, prepare for initial startup by first confirming that the oil level in the sump is within the correct operating range — replacing the industrial air oil separator filter can sometimes displace or consume a small amount of oil, and starting the compressor with low oil level risks compressor damage. Once oil level is confirmed, remove the lockout/tagout hardware and restore electrical power. Start the compressor and allow it to run unloaded for the first two to three minutes while you conduct a careful visual and auditory inspection of the separator housing.
Using a soap solution or an ultrasonic leak detector, check all joints, O-ring sealing faces, and reconnected lines around the separator housing for air or oil leaks. Any leaks identified at this stage should be corrected immediately by shutting down, re-pressurizing, and re-tightening or re-sealing the affected joint. Never allow the compressor to continue operating with a known leak at the industrial air oil separator filter housing, as pressures build quickly and small leaks can escalate into significant component failures.
Monitoring Differential Pressure and Oil Carryover
After confirming no leaks, allow the compressor to load fully and record the baseline differential pressure reading across the new industrial air oil separator filter. This reading — typically between 0.1 and 0.3 bar on a new element — serves as your baseline reference for future monitoring. Log this value in your maintenance records alongside the installation date and operating hours at the time of replacement. Regular monitoring of differential pressure is the most reliable way to track element health and schedule the next replacement before performance degrades.
Check downstream air lines for any oil presence after the first hour of operation by using white filter paper or an inline oil test kit. A correctly installed industrial air oil separator filter should produce oil-free air within the first few minutes of operation. If oil carryover persists beyond the initial startup period, this may indicate element misalignment, a bypassed scavenge line, or a seal failure — all of which require immediate investigation and correction. Document these verification results as part of your post-installation record.
Maintenance Best Practices for Industrial Air Oil Separator Filters
Establishing a Proactive Replacement Schedule
The industrial air oil separator filter is a consumable maintenance item, and treating it as such with a proactive scheduled replacement plan significantly reduces the risk of unexpected downtime. Build replacement intervals into your plant's preventive maintenance calendar based on the compressor manufacturer's recommended hours, your operating environment, and historical performance data from previous elements. In high-load or contaminated-inlet environments, shortening the replacement interval by 20 to 30 percent is a reasonable precaution that more than pays for itself in avoided compressor repairs.
Keep at least one spare industrial air oil separator filter element in your maintenance storeroom at all times. Extended lead times on specialty elements can leave a critical compressor offline for days if a replacement is not immediately available. Proper storage of the spare element — away from direct sunlight, moisture, and chemical vapors — ensures it will perform to specification when the time comes to install it.
Integrating Filter Health Into Broader Compressor Monitoring
Modern compressed air management systems often include continuous monitoring of differential pressure across the industrial air oil separator filter, with alarm thresholds that alert maintenance teams before pressure drop reaches critical levels. If your facility does not yet have this capability, consider installing a simple differential pressure gauge across the separator ports as a low-cost but highly effective monitoring tool. Visual checks on this gauge during weekly compressor inspections take only seconds and can provide weeks of advance warning before element condition becomes critical.
Pair industrial air oil separator filter monitoring with oil analysis programs that test for contamination, viscosity breakdown, and metal wear particles. Oil analysis can reveal early signs of internal compressor wear that will shorten filter element life if left unaddressed. Taking a systems-level view of compressor health — where the filter is one data point among several — leads to more accurate maintenance decisions and a longer overall service life for both the compressor and its components.
FAQ
How do I know if my industrial air oil separator filter is installed correctly?
The primary indicators of a correct installation are a leak-free separator housing at operating pressure, a baseline differential pressure reading within the normal range specified by the manufacturer (typically 0.1–0.3 bar on a new element), and the absence of oil in downstream compressed air lines after the initial startup period. If any of these indicators are abnormal after installation, shut down the compressor and inspect the element orientation, O-ring seating, and scavenge line connection before resuming operation.
Can I reuse the O-rings when replacing the industrial air oil separator filter?
It is strongly recommended to replace all O-rings and gaskets in the separator housing every time you install a new industrial air oil separator filter element. Reusing old O-rings is a common shortcut that frequently results in air leaks and oil bypass because the rubber has already been thermally cycled and compressed repeatedly. O-ring kits are inexpensive compared to the downtime cost of a post-installation leak, making them a wise standard inclusion in every filter replacement service.
What happens if the scavenge line is blocked during installation of the industrial air oil separator filter?
If the scavenge line — the small oil return tube at the base of the industrial air oil separator filter — is blocked or not properly reconnected, oil cannot drain back into the sump from the element base. This causes oil to accumulate at the element's inlet face, dramatically increasing pressure drop, reducing effective filtration area, and shortening element life. In severe cases, accumulated oil can be carried over into the compressed air system. Always verify that the scavenge line is clear, correctly aligned, and fully connected before completing the installation.
How often should the industrial air oil separator filter be replaced in a high-duty-cycle application?
In high-duty-cycle applications where the compressor runs 16 to 24 hours per day, the industrial air oil separator filter should be inspected for differential pressure at least every 500 operating hours and replaced based on differential pressure readings rather than strictly on calendar time. Reaching a differential pressure of 0.8 bar or higher is a reliable indicator that replacement is needed regardless of hours logged. Coupling pressure monitoring with regular oil analysis will give you the most accurate picture of replacement timing in demanding operating conditions.
Table of Contents
- Understanding the Role of the Industrial Air Oil Separator Filter
- Tools and Safety Preparations Before Installation
- Step-by-Step Installation of the Industrial Air Oil Separator Filter
- Post-Installation Checks and System Verification
- Maintenance Best Practices for Industrial Air Oil Separator Filters
-
FAQ
- How do I know if my industrial air oil separator filter is installed correctly?
- Can I reuse the O-rings when replacing the industrial air oil separator filter?
- What happens if the scavenge line is blocked during installation of the industrial air oil separator filter?
- How often should the industrial air oil separator filter be replaced in a high-duty-cycle application?
